Fry Pickles Like a Pro: Get Ultimate Crunch at Home
Step aside, French fries and onion rings – there's a new contender for the ultimate snack or side dish, and it brings a delightful tangy twist. We're talking about fried pickles: crispy on the outside, juicy and briny on the inside. For many, they're a beloved appetizer, a game-day staple, or simply a craving that needs satisfying. But if you're a true fried pickle fanatic, you know the heartbreak of a soggy, less-than-crisp bite. The good news? Achieving that perfect, restaurant-quality crunch at home is entirely within reach. With the right fried pickles recipe and a few insider tricks, you can master this savory delight and impress everyone at your next gathering.
The Quest for the Perfect Fried Pickle: Why Crunch Matters
What makes a fried pickle truly exceptional? It's that harmonious contrast: the satisfying shatter of a golden-brown crust giving way to the tender, tangy snap of a dill pickle. Without that crunch, you're left with a limp, greasy imitation, robbing the dish of its essential appeal. The secret to avoiding disappointment lies in understanding the science behind the fry and implementing techniques that champion crispiness from start to finish. We're here to guide you through every step, ensuring your homemade fried pickles are always a testament to ultimate crunch and flavor.
Unpacking the Ultimate Fried Pickles Recipe: Ingredients for Success
Every great dish starts with quality ingredients, and our fried pickles recipe is no exception. While seemingly simple, each component plays a crucial role in building that desired crunchy exterior and flavorful experience.
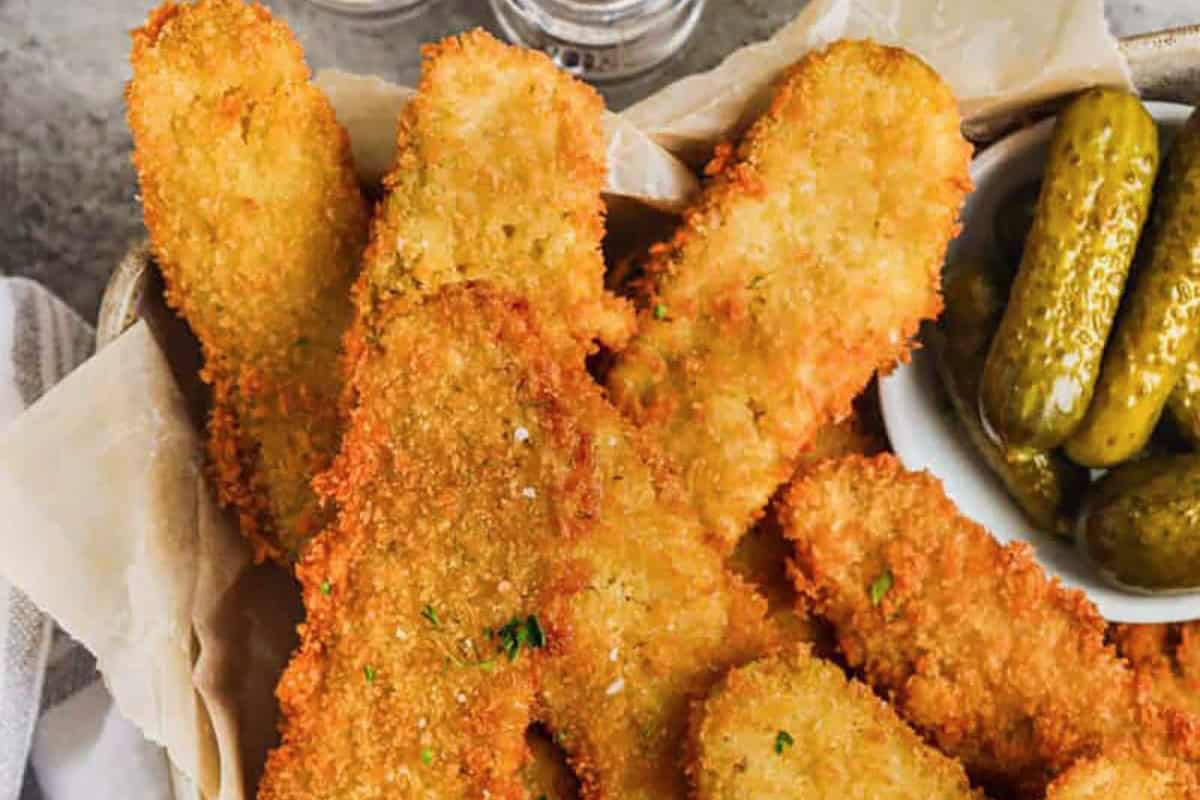
The Pickles: Spears or Chips?
- Pickle Spears: Many enthusiasts consider pickle spears the ideal shape for frying. Their robust size allows for a substantial, juicy pickle-y bite while still providing ample surface area for a crispy coating. This balance creates a deeply satisfying texture contrast.
- Pickle Chips: Absolutely! Pickle chips offer a different experience – more crunch per bite due to their thinner profile. If opting for chips, aim for even 1/4-inch thickness for consistent frying. Just remember they'll cook much faster than spears.
- The Golden Rule: Regardless of shape, the most critical step before breading is to thoroughly drain and pat your pickles completely dry. Moisture is the enemy of crispiness, and ignoring this step is a sure path to sogginess. For more on this vital technique, check out our guide on Never Soggy: Master Crispy Fried Pickles Every Time.
The Breading Process: A Three-Step Symphony of Crunch
Our pro-level recipe employs a classic three-step breading process, each layer designed to build flavor and ensure maximum adhesion and crispiness.
- All-Purpose Flour: This initial dredge acts as a crucial moisture absorber. Pickles, being stored in brine, are inherently wet. The flour creates a dry, adhesive surface, allowing the subsequent egg wash to cling effectively.
- Flavor Boost: Don't settle for plain flour! Seasoning this layer is key. We love garlic powder for its aromatic kick, but feel free to experiment with onion powder, smoked paprika, cayenne pepper for a little heat, a pinch of black pepper, or even a dash of a dedicated spice blend like Old Bay.
- Beaten Eggs: The eggs serve as the binding agent, the "glue" that allows the final breadcrumb coating to adhere securely to the flour-dredged pickles. A well-coated pickle is a well-crisped pickle.
- Panko Breadcrumbs: This is where the magic really happens for ultimate crunch. Panko breadcrumbs, a Japanese-style breadcrumb, are known for their light, airy, and flaky texture. Their larger surface area translates directly into a deeply satisfying, extra-crispy exterior. While Italian breadcrumbs can also be used, panko offers an undeniable textural advantage.
The Frying Medium: Oil Matters
Vegetable Oil: Ideal for frying due to its high smoke point (meaning it can reach the necessary high temperatures without burning) and neutral flavor profile. This ensures your pickles taste like pickles, not like the oil they're fried in. Other excellent choices include canola oil or peanut oil.
The Dipping Sauce: The Perfect Accompaniment
No fried pickle experience is complete without the perfect dipping sauce. While classic ranch dressing is always a winner, we highly recommend elevating it with a spicy kick. Mix in a few dashes of your favorite hot sauce to create a spicy ranch that beautifully complements the tangy, savory pickles. Other fantastic options include sriracha mayo, honey mustard, chipotle aioli, or even a dill-infused sour cream.
Mastering the Technique: Your Step-by-Step Fried Pickles Recipe for Pro-Level Crunch
Now that we've covered the ingredients, let's dive into the precise steps that guarantee crispy perfection every time. This fried pickles recipe focuses on technique, turning a simple snack into an art form.
1. Prepare Your Dipping Sauce First
Fried pickles are at their absolute best served immediately, straight from the fryer. Preparing your dipping sauce ahead of time ensures you're ready to enjoy them the moment they're done. Mix your ranch with hot sauce or assemble your preferred accompaniment.
2. Dry Those Pickles!
This cannot be stressed enough. Drain your pickle spears or chips thoroughly and then pat them relentlessly dry with paper towels. You want to remove every speck of excess moisture possible. This prevents steam from building up and making your breading soggy, and it ensures the flour adheres properly. This single step is the most crucial for achieving ultimate crunch.
3. Set Up Your Breading Stations
Organization is key for an efficient and effective breading process. You'll need three shallow dishes:
- Station 1: Flour Mixture: Combine all-purpose flour with your chosen seasonings (garlic powder, salt, pepper, paprika, etc.). Mix well.
- Station 2: Egg Wash: Whisk 2-3 large eggs in a separate dish until well combined.
- Station 3: Panko Breadcrumbs: Place panko breadcrumbs in the third dish.
4. The Breading Process
Work in batches to prevent overcrowding. Use one hand for the "wet" ingredients (egg) and the other for the "dry" (flour, panko) to minimize mess and ensure even coating.
- Dredge a pickle spear (or chip) thoroughly in the seasoned flour, shaking off any excess. Ensure it's completely coated.
- Dip the floured pickle into the egg wash, allowing excess to drip off.
- Immediately transfer the egg-coated pickle to the panko breadcrumbs. Press firmly to ensure the panko adheres to all sides. You want a thick, even coating.
- Place the breaded pickles on a clean plate or wire rack, not touching, while you bread the remaining pickles.
5. Frying to Perfection
- Heat the Oil: In a sturdy pot or Dutch oven, pour enough vegetable oil to submerge your pickles partially or fully (about 2-3 inches deep). Heat the oil to 350-375°F (175-190°C). A thermometer is highly recommended for accurate temperature control.
- Batch Fry: Do not overcrowd the pot. Fry only a few pickles at a time, ensuring they have enough space. Overcrowding will drop the oil temperature, leading to greasy, less crispy results.
- Golden Brown & Crispy: Fry the pickles for 2-4 minutes (less for chips), or until they are deeply golden brown and audibly crispy. Use tongs to gently flip them if needed for even cooking.
- Drain: Using tongs or a slotted spoon, carefully remove the fried pickles from the oil and transfer them to a wire rack set over a baking sheet. This allows excess oil to drain away, maintaining crispiness. Season lightly with a pinch of salt immediately after frying, if desired.
Beyond the Basics: Pro Tips for Next-Level Fried Pickles
- Spice it Up: Beyond the flour, consider adding a pinch of chili powder, smoked paprika, or even a touch of white pepper to your panko for an extra layer of flavor complexity. For a fun twist, a tiny pinch of sugar in the flour can enhance browning and balance the tang.
- Double the Crunch: For truly extreme crispiness, you can double bread your pickles. After the first round of flour-egg-panko, repeat the egg and panko steps. This creates an even thicker, more robust crust, though it will absorb a bit more oil.
- The Texas Roadhouse Secret: Many crave the iconic fried pickles from Texas Roadhouse. Their success often comes down to precise seasoning and frying techniques. For an in-depth look at how to replicate that famous flavor profile, check out our guide on Texas Roadhouse Fried Pickles: Make the Iconic Recipe.
- Reheating Leftovers: Like all fried foods, these are best enjoyed fresh. However, if you have leftovers, store them in an airtight container in the refrigerator. To reheat, place them on a wire rack set over a baking sheet and bake in a 350°F (175°C) oven for 10-15 minutes, or until crispy. Avoid the microwave at all costs – it will inevitably lead to soggy breading.
Mastering the art of the perfect fried pickle is incredibly rewarding. By focusing on proper drying, methodical breading, and precise frying temperatures, you can consistently achieve that ultimate crunch that makes this snack so irresistible. So grab your pickles, gather your ingredients, and get ready to fry like a pro. Your taste buds will thank you for this homemade fried pickles recipe!
