Game Day Ultimate Snack: Easy Crispy Fried Pickles Recipe
When it comes to game day, tailgates, or simply a cozy night in with friends, certain snacks hold legendary status. While French fries often grab the spotlight, there's a tangy, crunchy, and utterly addictive contender ready to steal the show: homemade fried pickles. Imagine a golden-brown exterior that shatters with every bite, giving way to a warm, juicy pickle interior bursting with tangy flavor. This isn't just any fried pickles recipe; this is your definitive guide to achieving the crispiest, most flavorful fried pickles every single time, transforming a simple appetizer into an unforgettable culinary experience.
We've all encountered the disappointment of a soggy fried pickle – a limp, greasy imitation of what could be. But fear not! Our comprehensive approach, packed with expert tips and tricks, guarantees a superior crunch and a burst of savory satisfaction. Get ready to elevate your snack game and become the hero of your next gathering with this ultimate fried pickles recipe.
Why Fried Pickles Are Your Game Day MVP
Forget the predictable chips and dips; fried pickles bring a dynamic flavor and texture profile that instantly captivates. They are the ultimate crowd-pleaser, delivering a perfect balance of salty, sour, and savory with an irresistible crunch. Here’s why they deserve a permanent spot on your game day spread:
*
Irresistibly Addictive: Hot, crispy, and perfectly seasoned, it's virtually impossible to eat just one. The combination of tangy pickle and rich, fried coating creates a snack sensation that keeps everyone reaching for more.
*
Effortless Entertaining: Fried pickles are surprisingly simple to make from scratch, and you can easily prepare large batches to satisfy a hungry crowd. They fry up in minutes, making them ideal for last-minute additions to your party menu or during commercial breaks.
*
Versatile Pairing: While they shine on their own with a dip, fried pickles are also a fantastic accompaniment to classic BBQ dishes, hearty comfort foods, or as a unique addition to an appetizer platter. They cut through rich flavors, offering a refreshing counterpoint.
*
A Unique Twist on a Classic: They offer a refreshing alternative to traditional fried snacks, demonstrating a touch of culinary flair without requiring advanced skills. This
Unlock the Secret to Crispy Fried Pickles Every Time will ensure your pickles are always a hit.
The Anatomy of the Perfect Crispy Fried Pickle: Key Ingredients & Their Roles
Achieving that coveted crispiness and vibrant flavor isn't magic; it's a careful orchestration of ingredients, each playing a vital role. Understanding these components is key to mastering the best fried pickles recipe.
Choosing Your Pickle Champion: Spears vs. Chips
The choice of pickle shape significantly impacts the eating experience. While both dill pickle spears and thicker-cut chips can be excellent, they offer different benefits:
*
Pickle Spears: Many aficionados prefer spears for their ideal pickle-to-breading ratio. They allow for a substantial, juicy pickle-y bite in the center while still providing plenty of surface area for an ultra-crunchy exterior.
*
Thick-Cut Chips: If you prefer a snack that's easier to pop in your mouth, thicker dill pickle chips (about 1/4-inch thick) are excellent. They offer a fantastic breading-to-pickle ratio, ensuring a good balance in every bite. If store-bought chips are too thin, you can easily slice whole dill pickles yourself.
Regardless of your choice, the single most critical step is to
pat your pickles thoroughly dry with paper towels. Pickles are inherently wet, and excess moisture is the enemy of crispiness. Drying them creates a better surface for the breading to adhere to, preventing a soggy coating.
The Triple-Threat Breading System
Our recipe relies on a classic three-step breading process – a technique proven to deliver maximum crunch and adherence.
1.
All-Purpose Flour: This is your foundational layer. By coating the dried pickles in flour first, you create a dry, slightly rough surface. This acts as a crucial primer, allowing the egg wash to stick effectively, which would otherwise struggle to adhere to a wet pickle. We elevate the flavor here by seasoning the flour with essential garlic powder and salt, offering a subtle savory boost. Feel free to experiment with other spices like paprika, cayenne pepper, or onion powder for your unique twist.
2.
Beaten Eggs: The whisked egg acts as the "glue" that binds the final, crunchy layer to the pickle. Eggs are crucial for ensuring the breadcrumbs adhere evenly and completely, forming a robust barrier that crisps up beautifully during frying.
3.
Panko Breadcrumbs: This is where the magic truly happens for unparalleled crispiness. Panko, a Japanese breadcrumb, is superior to traditional breadcrumbs due to its light, airy, and flaky texture. These larger, irregularly shaped crumbs offer significantly more surface area, resulting in a deeply satisfying, almost airy crunch that holds up exceptionally well. While Italian breadcrumbs can be used, panko guarantees that signature shatter.
The Unsung Hero: Frying Oil & Temperature Mastery
The right oil and precise temperature control are non-negotiable for perfectly golden, non-greasy fried pickles.
*
Vegetable Oil: Ideal for frying due to its high smoke point and neutral flavor. Oils like vegetable, canola, or peanut oil can withstand high temperatures without burning, ensuring your pickles cook evenly without absorbing unwanted flavors or developing a burnt taste.
*
Optimal Temperature: Heat your oil to precisely 350°F (175°C). This temperature is key: if the oil is too cool, the pickles will absorb excess oil and become greasy; if it's too hot, the breading will burn before the pickle inside is properly heated and the coating is set. If you don't have a thermometer, you can test the oil by flicking a small splash of water into the pan; it should sizzle vigorously.
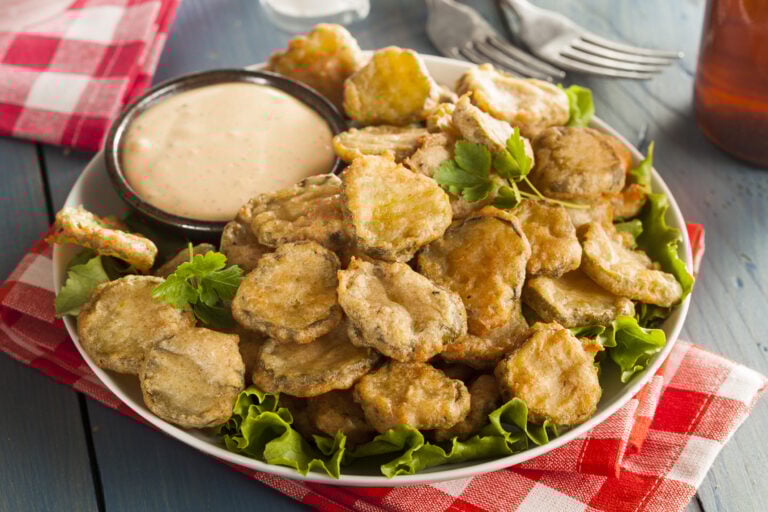
The Ultimate Dipping Companion: Spicy Ranch
While fried pickles are fantastic on their own, a cooling, creamy dip takes them to the next level. Our recommendation? A homemade spicy ranch. Simply combine your favorite ranch dressing with a few dashes of hot sauce (like Tabasco, sriracha, or your preferred brand) to taste. The creamy, herby notes of the ranch beautifully complement the tangy pickles, while the gentle kick of hot sauce adds an exciting counterpoint, creating a truly unforgettable dipping experience. This pairing is so good, it's featured in our
Homemade Fried Pickles: The Panko & Spicy Ranch Recipe.
Mastering the Art of Crispy Fried Pickles: Step-by-Step Recipe & Pro Tips
Ready to create your own masterpiece? Follow these steps for the crispiest, most delicious fried pickles you've ever had.
Preparation is Key
1.
Dry Your Pickles: As mentioned, this is crucial. Lay your pickle spears or chips on a double layer of paper towels and pat them thoroughly dry. Let them sit for a few minutes to air dry further if you have time.
2.
Set Up Your Dredging Station: Arrange three shallow bowls in a line:
* Bowl 1: Whisk together 1 cup all-purpose flour, 1 teaspoon garlic powder, and 1/2 teaspoon salt.
* Bowl 2: Whisk 2 large eggs until completely incorporated.
* Bowl 3: Place 1.5 cups panko breadcrumbs.
3.
Heat the Oil: Pour about 1.5 inches of vegetable oil into a large, deep skillet (ideal for spears) or a shallow cast-iron skillet (perfect for chips). Heat over medium-high heat until it reaches 350°F (175°C).
The Dredging Dance
This process requires a delicate touch to ensure an even, crisp coating.
1.
Flour First: Toss a few pickle spears (or chips) at a time in the seasoned flour, ensuring they are fully coated. Shake off any excess flour; you want a thin, even layer, not clumps.
2.
Egg Dip: Dip the floured pickles into the whisked egg, allowing any excess egg to drip off. A light coating is all you need.
3.
Panko Roll: Finally, roll the egg-dipped pickles generously in the panko breadcrumbs. Press gently to ensure the panko adheres well to all surfaces. Again, shake off any loose crumbs.
4.
Work in Batches: Dredge only 3-4 pickles at a time to prevent the bowls from becoming overcrowded and the breading from clumping. Once dredged, immediately transfer them to a plate or a cooling rack set over a baking sheet, ensuring they don't touch each other.
Frying to Golden Perfection
1.
Fry in Batches: Carefully place 3-4 dredged pickles into the hot oil, ensuring you don't overcrowd the pan. Overcrowding will drop the oil temperature, leading to greasy pickles.
2.
Flip and Fry: Fry for about 1-2 minutes per side, or until both sides are beautifully golden brown and crispy.
3.
Drain and Cool: Using tongs, carefully remove the fried pickles from the oil. Place them immediately on a wire cooling rack set over a baking sheet lined with paper towels. The cooling rack allows air to circulate, preventing the bottoms from becoming soggy. Season lightly with a pinch of salt if desired. Repeat with the remaining pickles.
Elevate Your Snack Game: Serving Suggestions & Variations
While spicy ranch is a fantastic companion, don't limit your creativity!
*
Dipping Sauce Diversity: Offer a variety of dips like honey mustard, sriracha mayo, garlic aioli, or even a classic BBQ sauce.
*
Spice it Up: Experiment with adding a pinch of smoked paprika, chili powder, or even a touch of Cajun seasoning to your flour mixture for an extra kick.
*
Herbaceous Hints: Finely chopped fresh herbs like dill or parsley can be mixed into the panko for a fresher flavor profile.
*
Perfect Pairings: Serve your crispy fried pickles alongside homemade burgers, pulled pork sliders, grilled cheese, or as part of a larger tapas-style appetizer spread.
Whether you're hosting the ultimate game day party or simply craving a satisfyingly crunchy snack, this easy crispy fried pickles recipe is your ticket to culinary success. With a few simple steps and key techniques, you'll be frying up golden, tangy perfection that will impress every palate. So, ditch the boring snacks, embrace the crunch, and get ready to enjoy the ultimate fried pickle experience!